This is a puzzle box I made for a friend’s birthday. It was a challenging, but incredibly fun project to make.

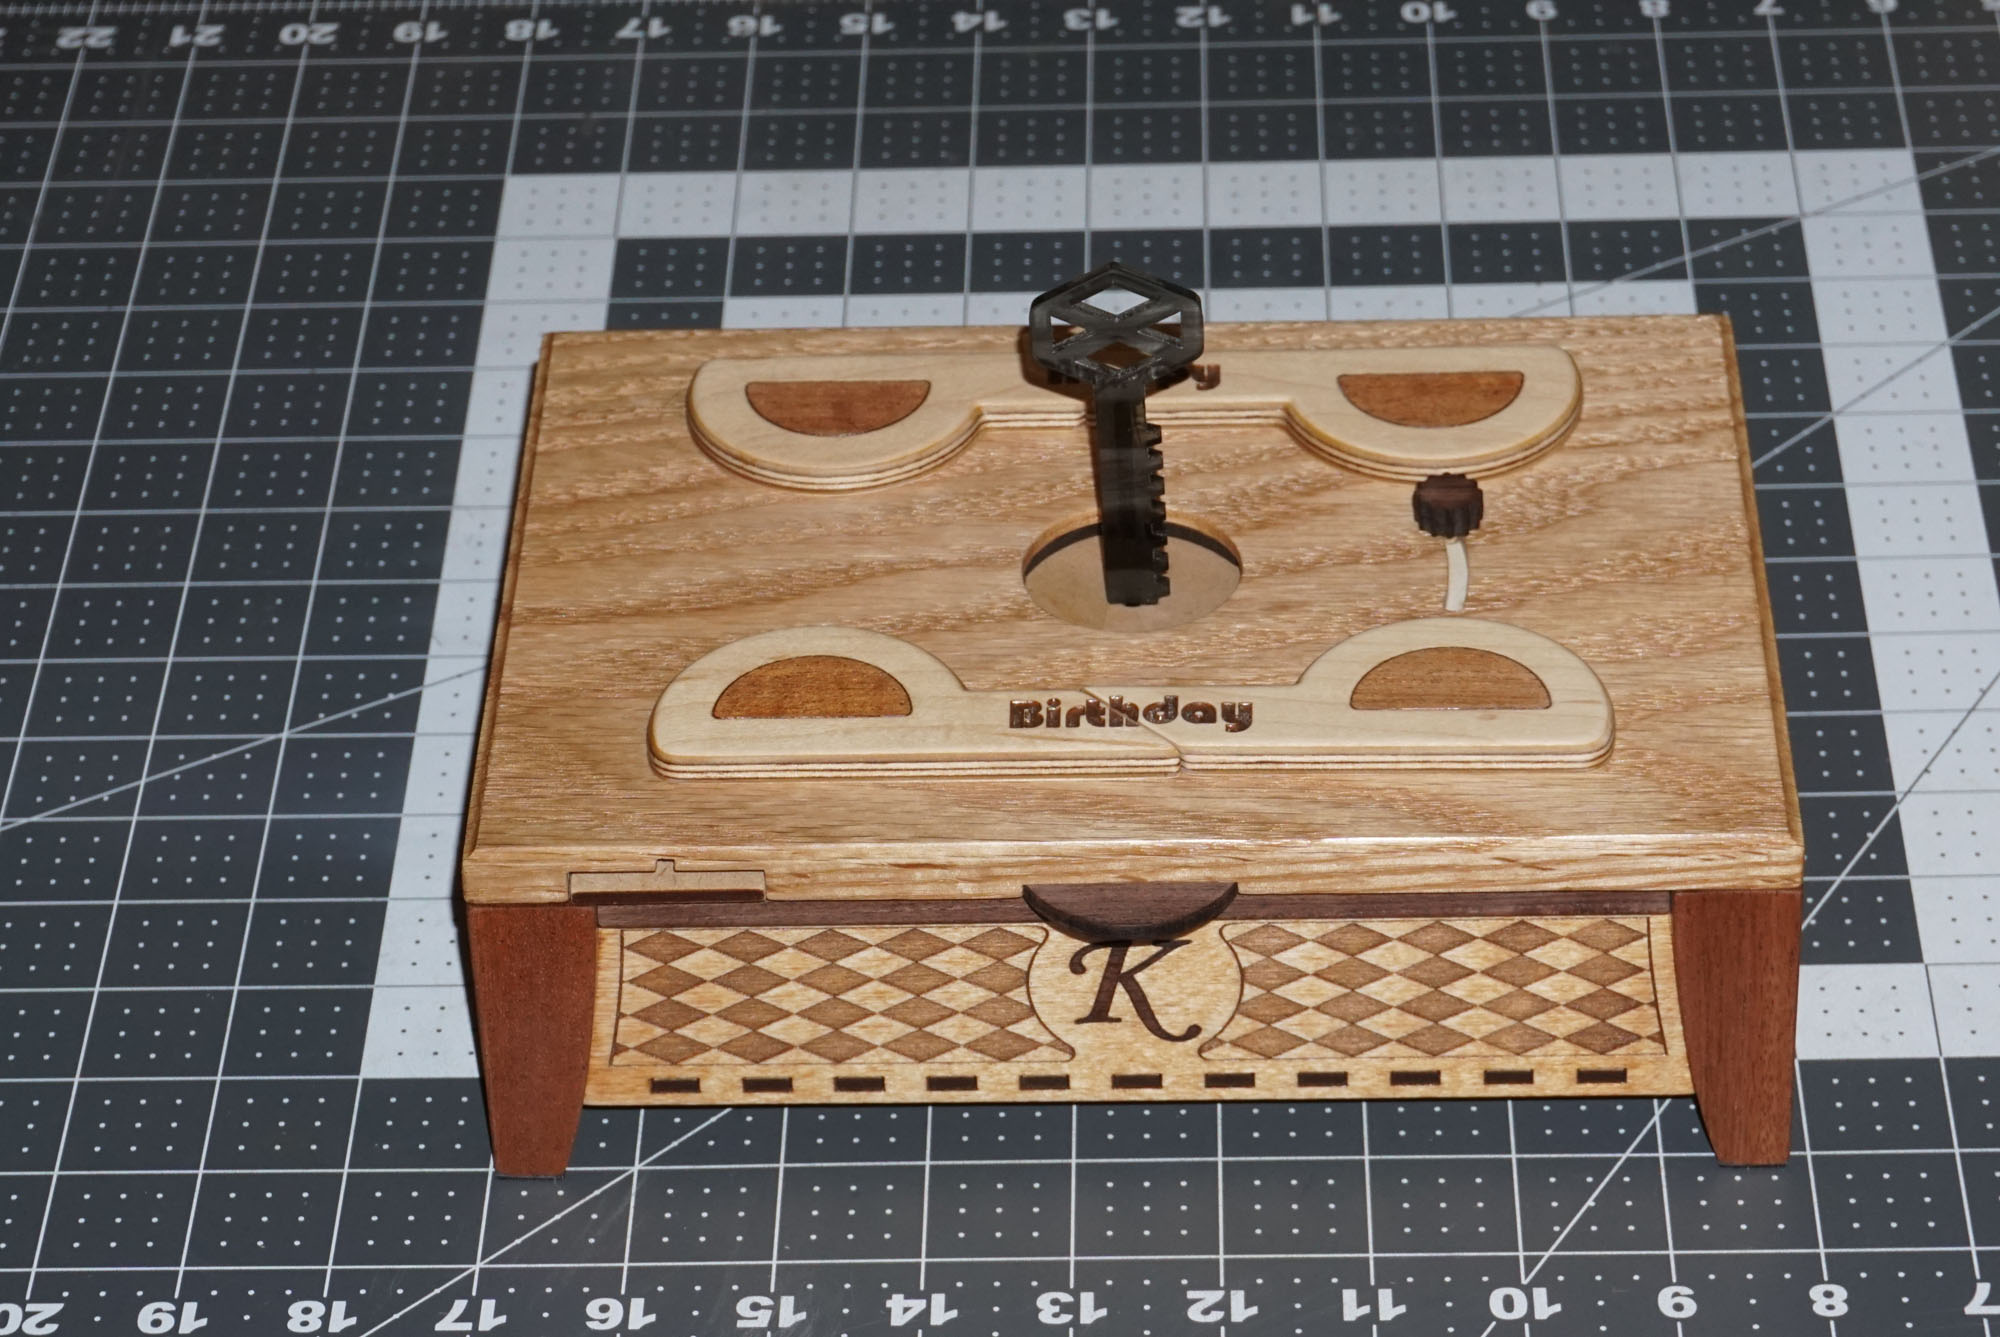

The puzzle is rather simple. The iris is controlled by the slider on the right. The movement is blocked by the 4 levers. The levers have to be turned in the right order to unlock the slider as it opens the iris. The final push of the slider fully opens the iris and ejects the key. The key is then used to unlock the box.
The overall look was inspired by the Kickstarter project Codex Silenda.
Puzzle mechanism
The iris follows the design from here: http://www.instructables.com/id/Mechanical-iris-v20/
It is cut in a clever way that fits in a single layer. Most other iris designs are not as compact.
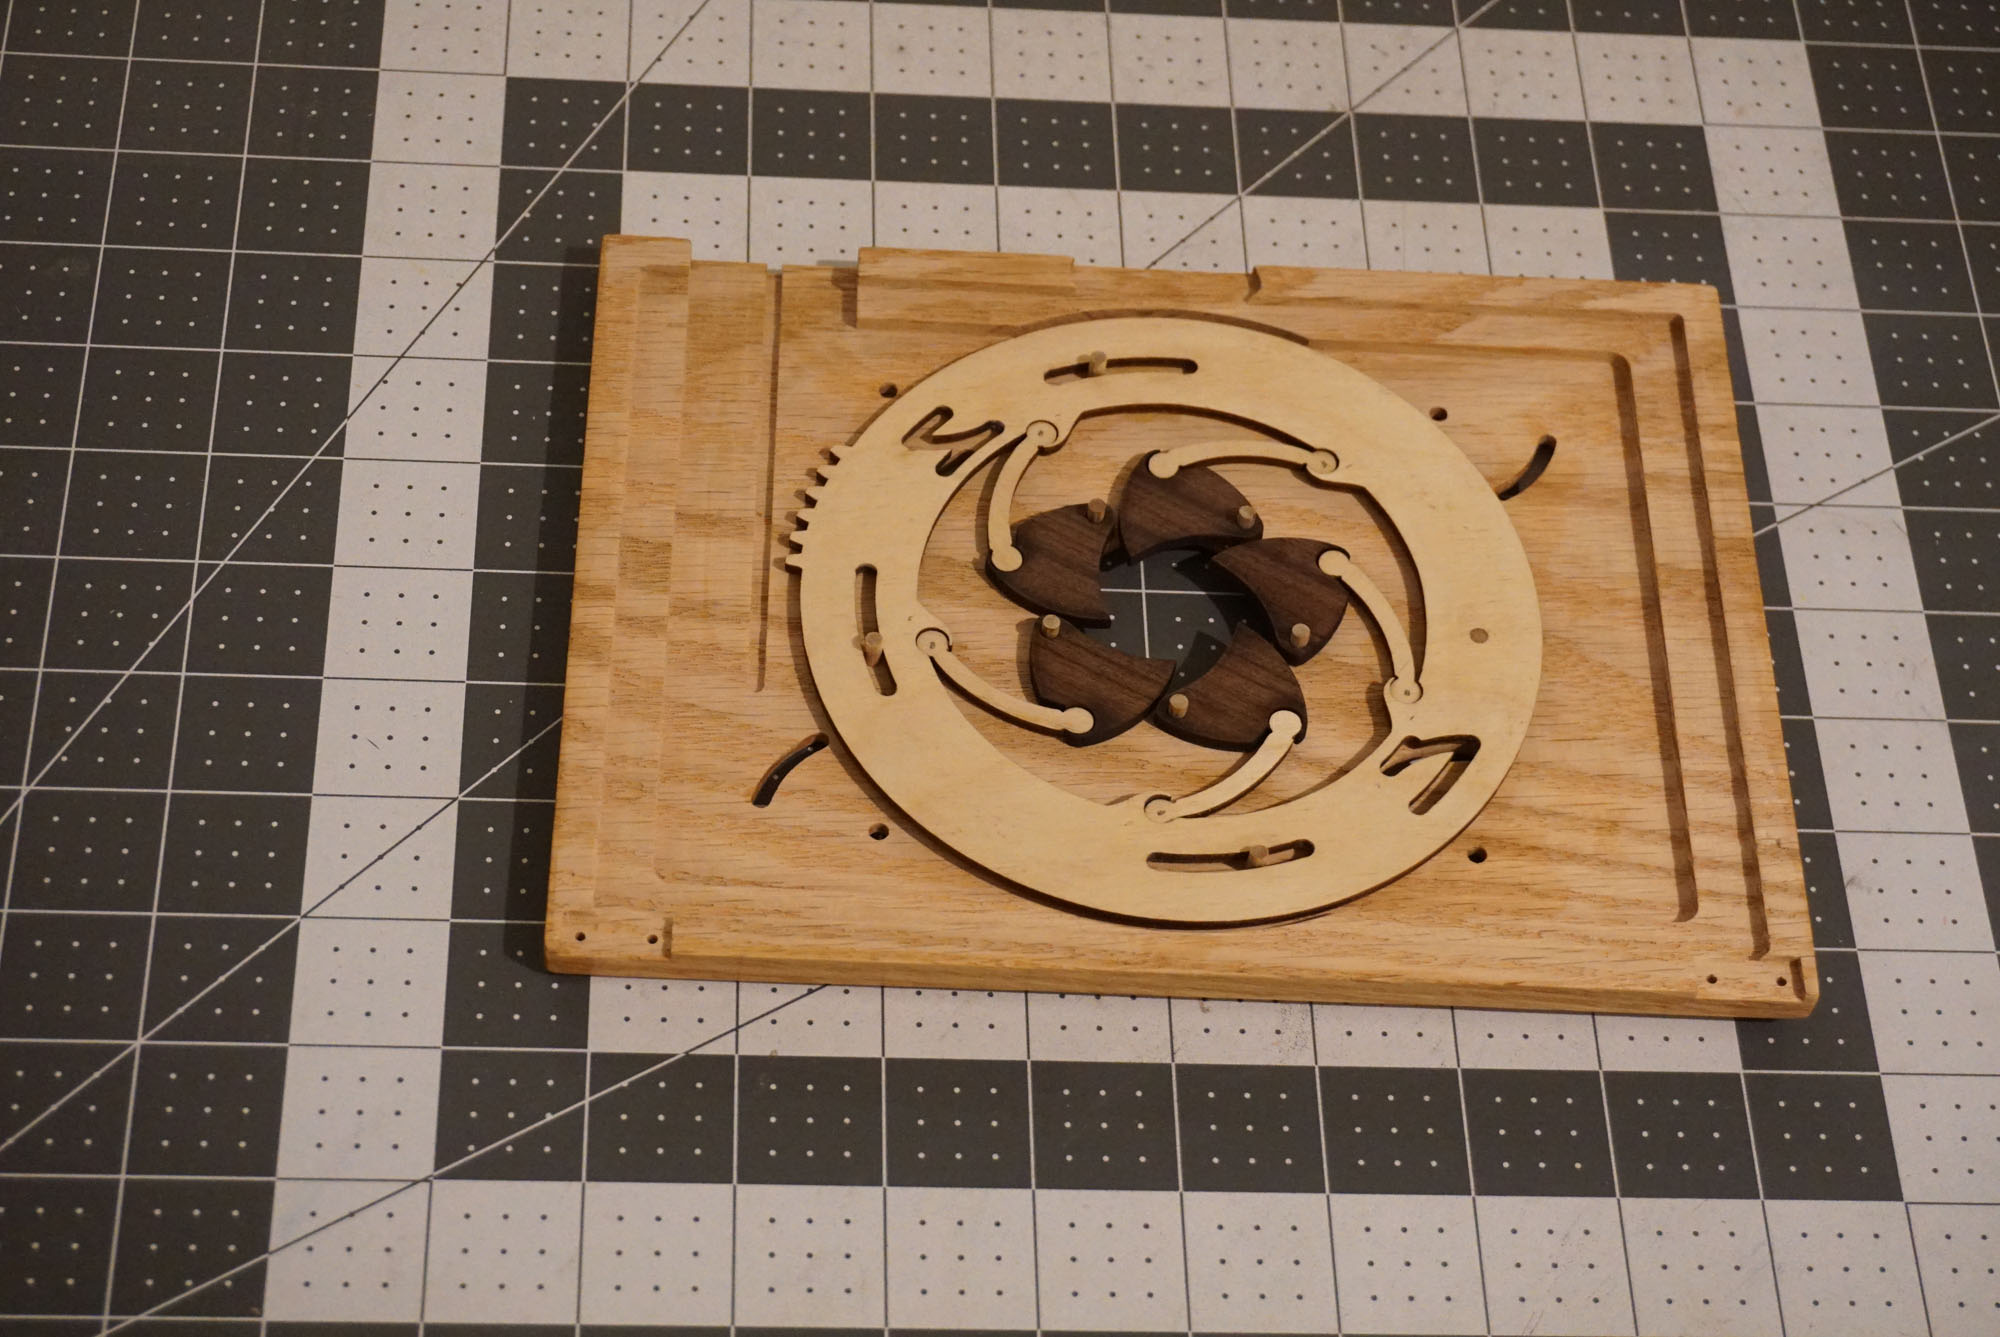
The ring for the iris has slots that block the rotation unless the levers are in the right position.
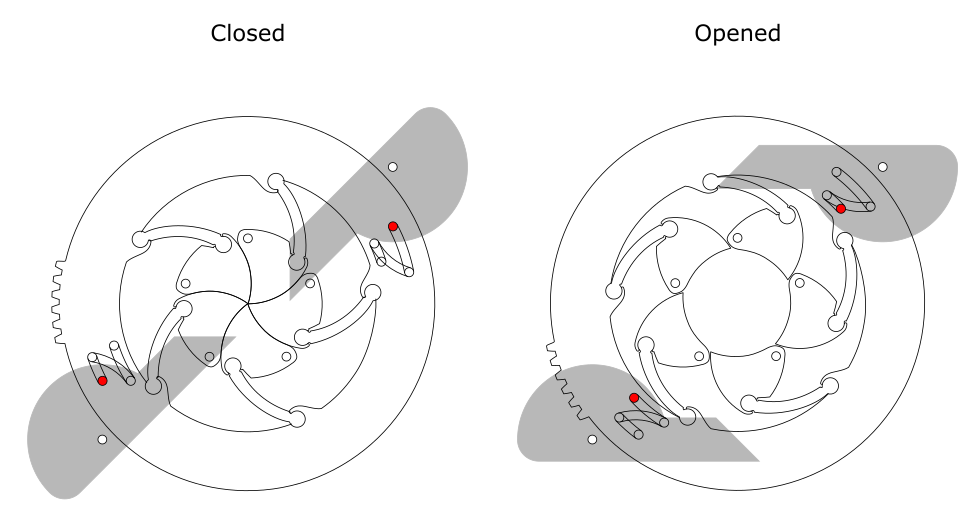
Only two of the levers are connected to the ring. The other two are decorative.
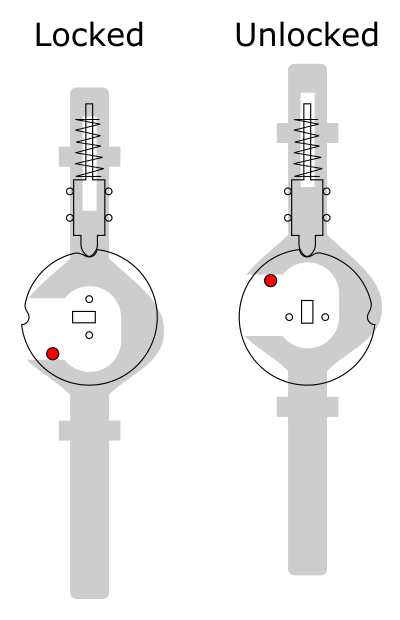
The key is made of two pieces of acrylic, glued together in a T shape.

The lock mechanism requires the key to be turned 90 degrees between the locked and unlocked state. What makes the lock “click” is the small plastic plunger in the back, which is pressed against the tumbler by a spring.

Making the box
You can find the 3D model for the box here: https://a360.co/2HiTPpj
The Fusion 360 project contains the schematics for the lid, the levers, and the 4 legs.
The blueprints for the laser-cut pieces are here: happy_birthday_box.svg
The top portion of the lid is made of 3/4″ red oak. It is machined on the Roland in 3 steps:
- Drill 4 holes for the 1/4″ attachment screws. Make larger holes for the screw heads to allow the screws to sink below the top plane of the model
- Screw the stock to the table and machine the top face. The face operation must cover the entire stock, or at least be wider than the mounting table. This will allow the stock to sit flush on the table when flipped
- Flip the stock, screw it down, and machine the bottom
The coordinate system is selected to be the exact center of the table. This ensures that the top and the bottom operations match perfectly when the piece is flipped.


The levers are made of 6mm appleply plywood: http://www.crosscuthardwoods.com/multi-ply.html
The initial stock is laser-cut to exact dimensions 220x120mm. Then alignment pins are used on the Roland to secure the stock at the correct location to mill both sides.
The lettering and the grooves for the decorative half-circles are laser-engraved afterwards. The alignment is done by hand, because exact positioning is not critical.
The decorations themselves are laser-cut mahogany veneer.

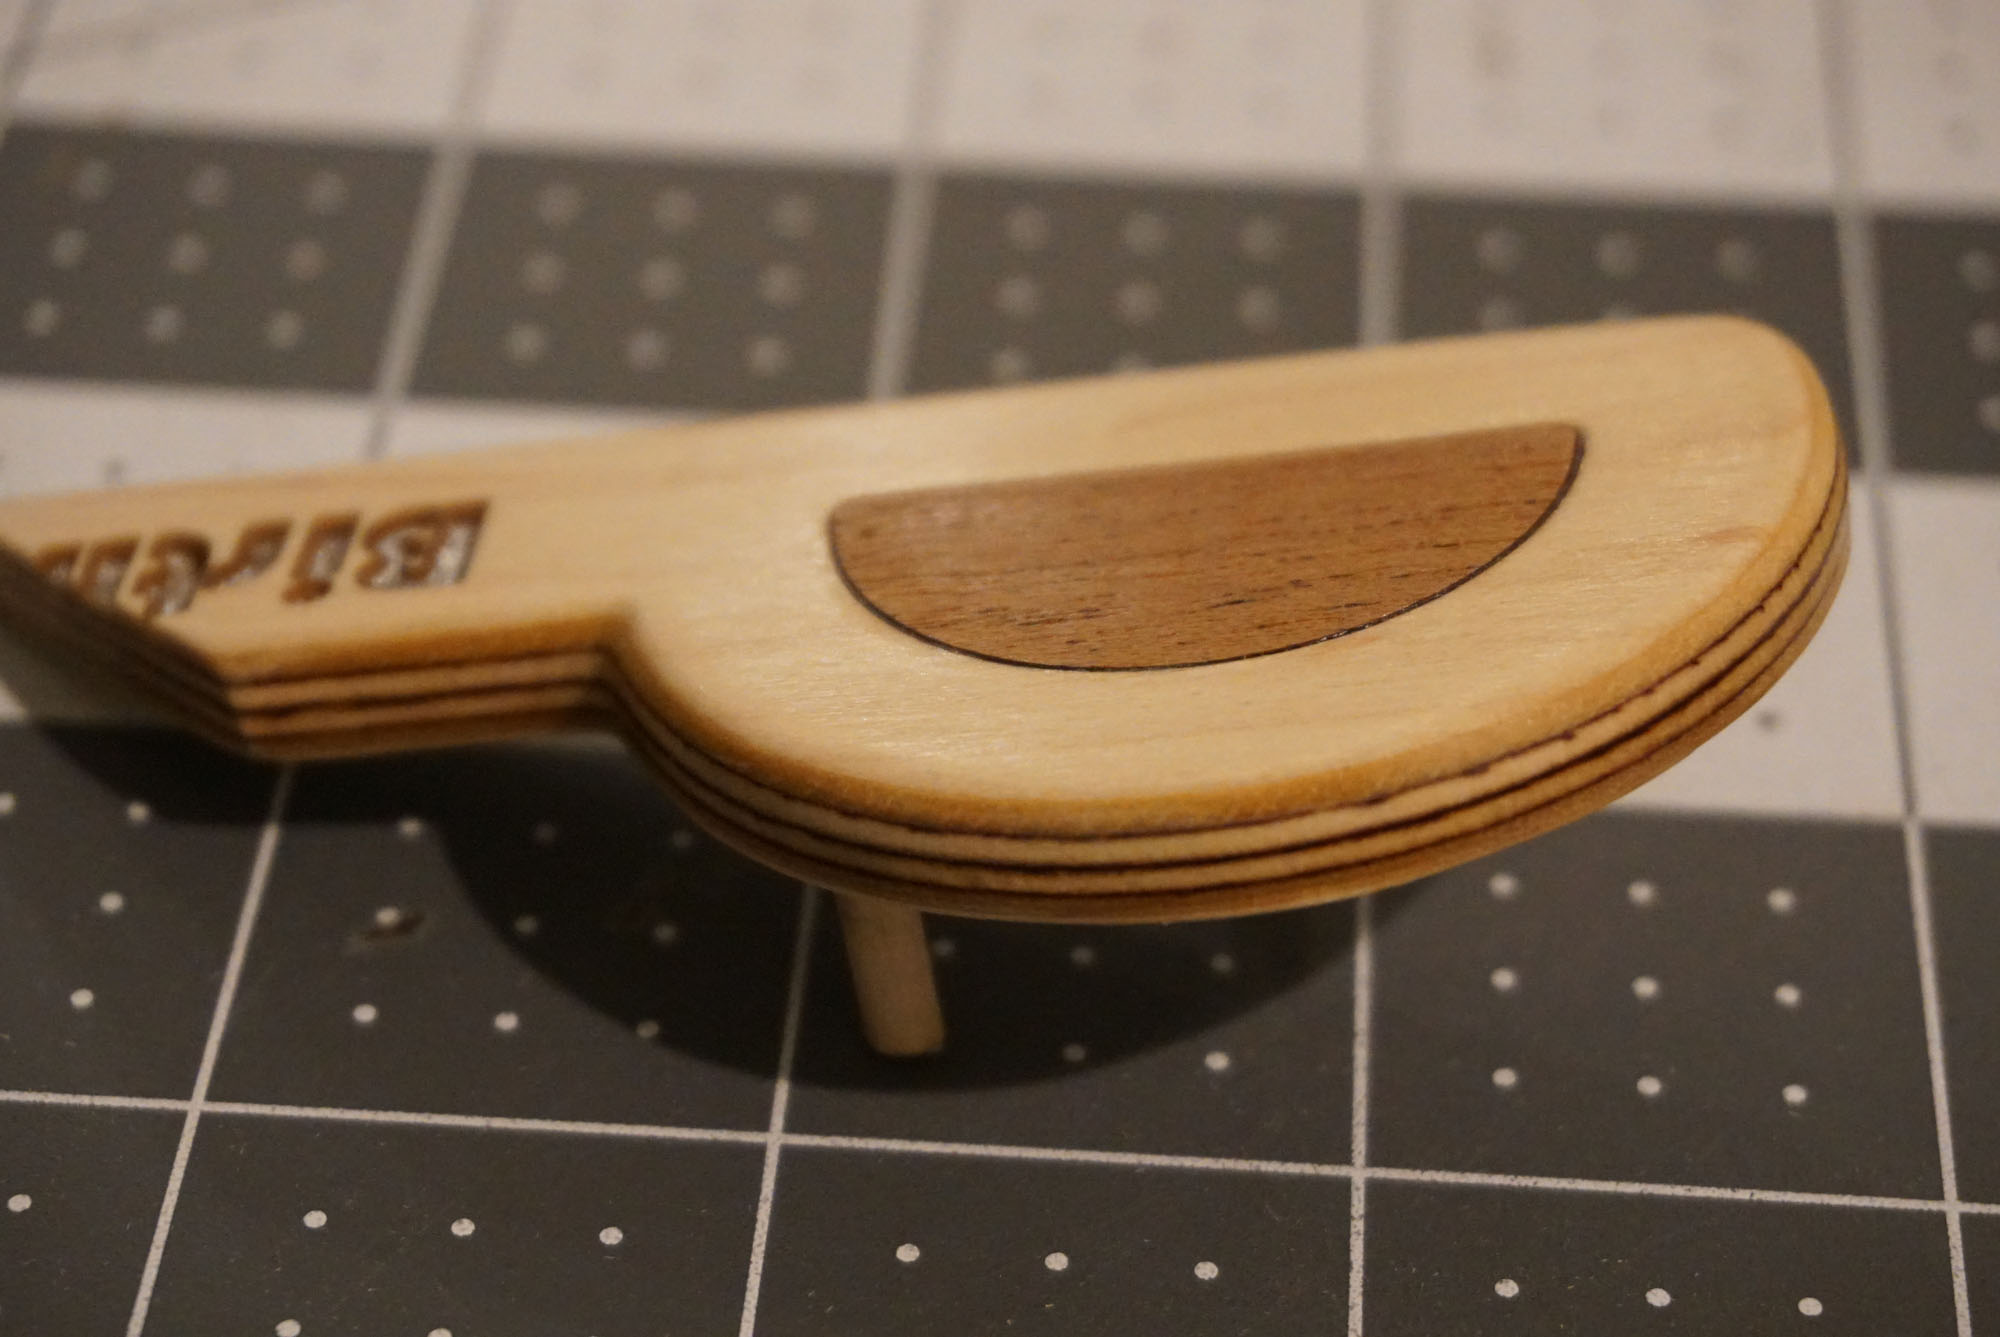
The legs are made of 2×2″ sapele wood. It is machined using the rotational A-axis. The front two legs are identical, and the rear legs have mortises for the hinges. The holes for the hinge screws are drilled by hand. I couldn’t figure out a way to make them as part of the CNC process.

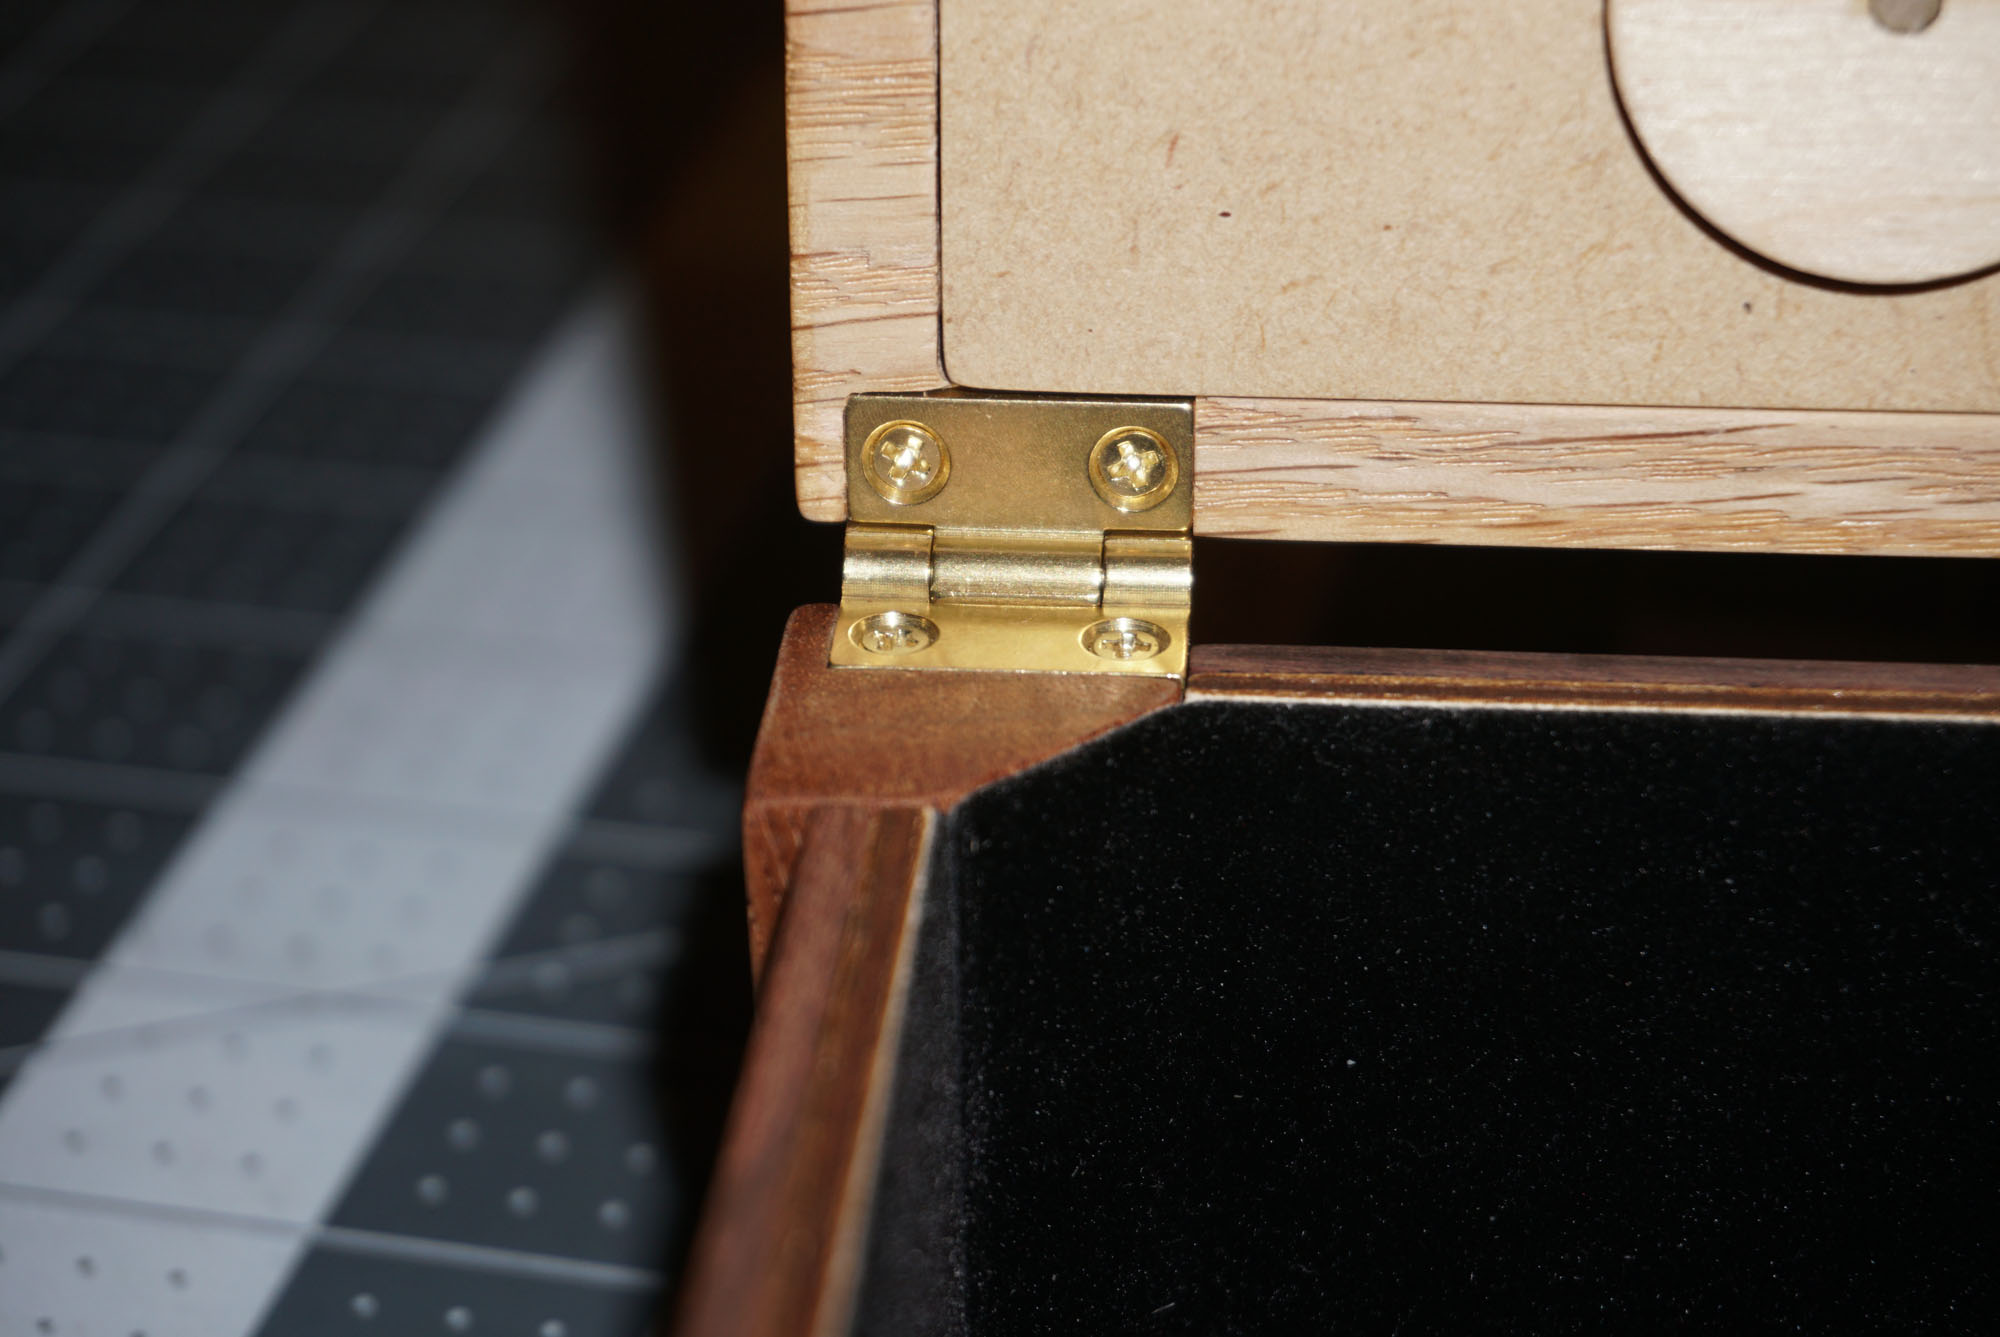
The hinges I used are the JB-101 from Brusso: http://www.rockler.com/brusso-solid-brass-small-box-stop-hinges
The screws that come with them are solid brass, which is very soft. They are quite unforgiving (and also too long for the box lid). I used cheap brass-coated steel screws instead.
The walls of the box are made of 3mm birch plywood. The plywood is almost white, but I wanted something a shade darker. What worked best is a prairie wheat gel stain. I left it on for only few hours before applying the first coat of the gel polyurethane topcoat. Because the stain was still not fully dry, the topcoat diluted the paint and reduced the saturation.

The iris, the handle, and the decorative pieces are 1/8” Bolivian rosewood. Once it is sanded, it has beautiful finish itself and doesn’t require any coating.
The bottom of the box and the cover for the box lid are laser-cut 3mm MDF. It is critical for these two pieces to be perfectly flat. Otherwise the box will be warped and the lid will not align.
The inside of the box is lined with self-adhesive velvet: http://www.rockler.com/self-adhesive-velvet-choose-velvet-color
Learned the hard way
It took many iterations to perfect the design and the manufacturing process. Here are some of the lessons I learned along the way.
Oak has long grain and produces long chips during conventional milling. It can sometimes tear off chunks from the surface. For face operations I use two-way cutting for the majority of the passes, then switch to climb-only for the final 1-2 roughing passes and the finishing pass.
To reduce tearing along edges (where a horizontal face meets a vertical wall of a slot or a hole), leave the finishing pass for the horizontal face as the last operation – do the face roughing passes first, then the vertical passes, and finally do the finishing pass for the face. It takes more time, and possibly few tool changes, but the end result is much cleaner.
Sapele was surprisingly good for machining, with very little splintering. The beautiful grain pattern was a nice unexpected bonus.
Plywood tears up when it is cut with standard spiral cutters. Preferably use down-cut or straight flute cutter.
The veneer of the appleply cracks very easily. I had to use slow and shallow cuts with the straight flute cutter for operations near the top 1mm of the material. Also, at the end of the final contour operation the bottom layer cracked and the piece broke off before it was finished. I got better results by leaving the bottom 0.5 mm of the material and finished the cutting by hand using utility knife.
It is hard to get perfectly flat 3mm plywood sheet. Even if it is at first, it can warp over time. For large flat surfaces MDF works better, even though it is not as pretty.
My first prototype was coated with Danish Oil. That didn’t go so well. It smelled for months afterwards. Possibly there is a way to do this better, like use another product either before or after the oil. But my results were not satisfactory.
Gel polyurethane topcoat works great: https://www.amazon.com/dp/B00QU4IX6S
It is easy to apply and quite forgiving. It can be applied with a foam brush, a wooden stick, or even a toothpick. Wipe it with a paper towel. Just make sure you wait enough time between coats (at least 12 hours).
I needed a large number of dowel pins. Cutting them by hand (even with a Dremel) is tedious. What worked best is to cut a long rod into pieces on the laser cutter. Then just sand the burnt ends.
Good hinges are surprisingly hard to find. The ones you see at craft stores or home improvement stores are cheap, but flimsy and inaccurate. I had to get 3 pairs from Ben Franklin to find a matching set. The good ones like Brusso are quite expensive. I wish there was something in between.
The self-adhesive velvet can be peeled and repositioned a few times before it loses its stickiness. During my tests I was able to do this even on the next day after the initial application.
Getting the lid to match the box perfectly on all sides was challenging. A misalignment of even a few tenths of a millimeter can ruin the look. Most box-making tutorials suggest you make the entire box first, then cut it in two halves. This didn’t work for me because of the lid complexity, and because I wanted to use a different materials for the top and bottom. It required a lot of dry fitting to make sure everything lines up before the final assembly. Looking back, possibly a better approach would be to not even try, and have some overhang for the lid so precision is not as critical.